
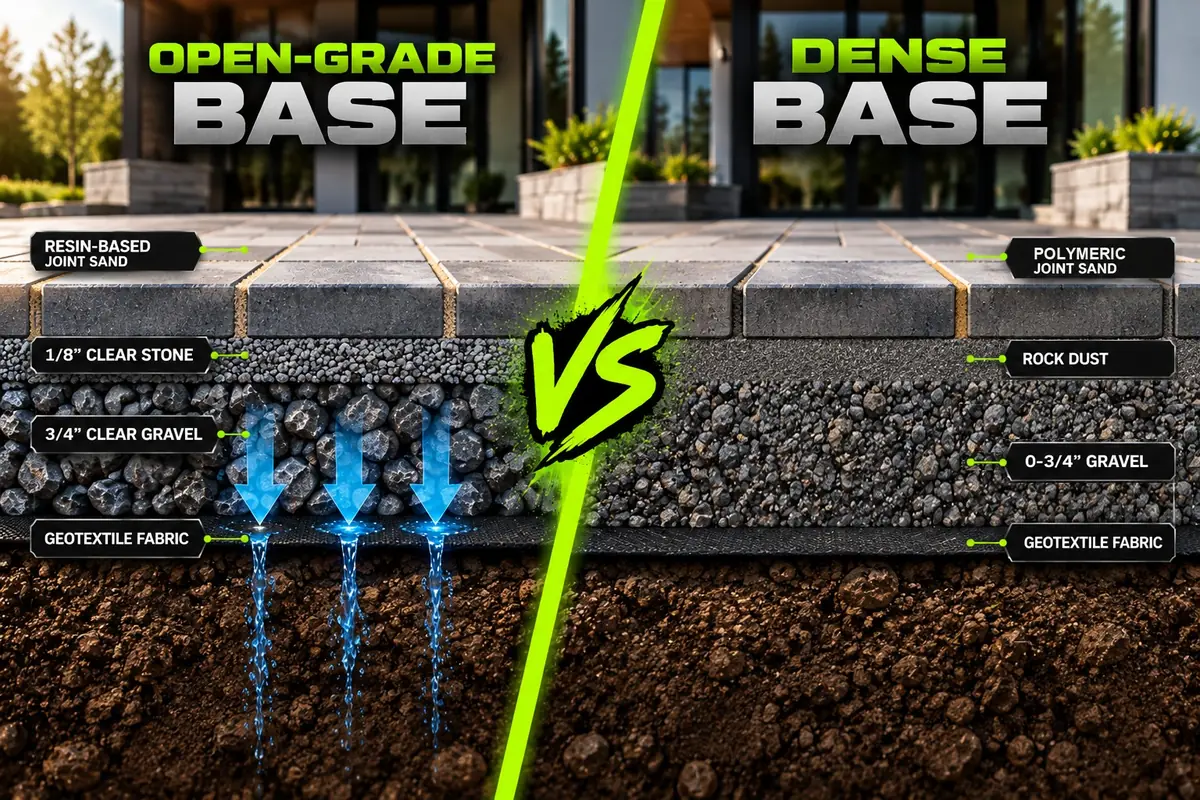
Most paver problems in Montréal have nothing to do with the pavers. They start in the base underneath, and almost always because of water. A paver surface is only as flat as what it sits on, and what it sits on has to survive dozens of freeze-thaw cycles every winter.
What freeze-thaw does to a paver base
When water freezes, it expands by about 9%. If water is sitting in the stone and soil under your pavers when the temperature drops, that expansion has nowhere to go but up. It lifts the pavers. When it thaws, the ground softens and drops back, but rarely to the same level it started at.
In Montréal that cycle repeats many times between November and April, often several times in a single week. Snowmelt in March and April adds more water at exactly the wrong moment. Many properties in the West Island and Vaudreuil-Soulanges also sit on clay-rich soil, which holds water instead of letting it drain away.
So the real question for a paver installation isn’t “how strong is the base?” It’s “where does the water go?”
Heaving vs. settling: how to tell them apart
Both make pavers uneven, but they have different causes and different fixes.
| Heaving | Settling | |
|---|---|---|
| What you see | Raised humps, lifted edges and corners | Dips, low spots and puddles after rain |
| When | Winter and early spring, may ease in summer | All year, slowly getting worse |
| Where | Shady areas, near downspouts, poorly drained edges | Where cars drive and turn, low spots, over loose fill |
| Main cause | Water freezing in or under the base | Base that was too thin, poorly compacted or washed out |
| Other signs | Whole sections lift together | Loose or rocking pavers, widening joints, sand disappearing |
A simple test: take photos of the same spot in February and again in July. If the problem shrinks in summer, it’s frost heave. If it stays or grows, the base is settling.
Why a traditional base holds water
Many installations are built on dense crushed stone, often called “0-3/4” or road base. It’s a mix of stone sizes plus fine dust. Compacted properly, it’s very hard. The problem is those fines: they pack the gaps between the stones and act like a wick, pulling moisture up and holding it in the base.
That trapped water is what freezes and lifts the pavers. Dense bases also depend on being compacted at exactly the right moisture content, in thin layers. When that step is rushed, or the base is dug too shallow to save time, settling follows a few years later.
What an open-graded base is
An open-graded base uses clean, crushed stone of similar size with no fines. Because there’s no dust to fill the gaps, roughly a third of the base stays open space. Water that gets through the joints drains straight down through those gaps instead of sitting under your pavers. There’s nothing left in the base to freeze and push up.
The angular stones lock together when compacted, so the base is stable without relying on fines. Here’s how we build ours:
- Excavate 12 to 18 inches. We remove the soft, frost-prone top layer and dig down to stable ground.
- Compact the soil and lay geotextile fabric. The fabric separates the native soil from the stone. Water passes through it, but the soil can’t work its way up into the base and clog it.
- Build 8 to 14 inches of compacted 3/4 in clear stone. This is the structural base: clean, angular, and full of open space for drainage.
- Add 1 inch of 1/8 in clear stone. A free-draining bedding layer to set the pavers on, used instead of sand, which holds water.
- Lay Techo-Bloc pavers and fill the joints with resin-based permeable sand. We use Alliance Gator products for the joint sand, edging and Gator Base. The joints stay locked but still let water through.
- Secure the edges. Solid edge restraint keeps the pavers from spreading outward over time.
The benefits you actually notice
- Pavers stay flat through winter instead of lifting and dropping every spring.
- No puddles on the surface after rain or snowmelt.
- Joint sand lasts longer because the base stays dry.
- Fewer weeds between pavers, since there’s less moisture for them to grow in.
- Less repair work over the life of the driveway or patio.
Is it more expensive?
Yes. Clean stone costs more than road base, the geotextile fabric is an added material, and digging 12 to 18 inches takes more time than a shallow dig. That’s a big part of why our quotes aren’t the cheapest.
But the base is the one part of your project you can’t upgrade later without tearing everything out. Paying once for a base that drains is almost always cheaper than lifting and re-levelling pavers every few years. It’s also why we can put a 3-year guarantee on the jointing material and levelling of every paver project.
Questions to ask any paver contractor
- How deep will you excavate?
- What base material will you use: dense road base or clean, open-graded stone?
- Will there be geotextile fabric between the soil and the base?
- What do you set the pavers on: sand or clear stone?
- What joint sand do you use, and what edge restraint?
- What does your guarantee cover, and for how long?
If the answers are vague, the base probably is too.
Weighing up your driveway options? Read our comparison of pavers vs. asphalt driveways in Montréal.
Want to see what your project would look like?
We’ll meet you on site, walk you through a few options and show you your project in 3D before we break ground. The consultation is free.